Use XState with React Hooks
Over the last few months, I’ve been working on a ground-up rewrite of my state machines course. Despite the fact that it’s only a few months old — originally launched in August 2018 — there have been some pretty major developments in the both of the main libraries that the course relies upon heavily: XState and React.
As part of the rewrite, I’ve been doing a ton of tinkering with all the new features in both, trying to find places where I can make code quality improvements in the app that the course is centered on. In the process of that exploration, I have become incredibly fond of using statecharts with hooks.
When I sat down to write this post, I started looking back at some reference material and ended up looking at the code example in my last post, which was published just a couple of weeks before hooks were announced. All of a sudden, that example started looking really dated to me… it’s amazing how patterns can change so much, so quickly.
So, in this post we’re going to rewrite that example payment form from scratch using hooks. Here’s a quick look at the form we’ll be wiring up:
If you'd rather check this out in video form, I recently published a video on my YouTube channel that covers the material found in this article:
Without further ado, let's dig in!
Hooks at a glance
If you’re not familiar, hooks were released in React 16.8 and provide developers with a way to use React features — like state and lifecycle methods — within function components. Prior to 16.8, if you needed a stateful component, you were required to write a class which had a fair number of tradeoffs.
In short, hooks allow us to simplify our components by flattening out our component hierarchy, breaking our application logic into reusable chunks, and avoiding unnecessary nesting components with patterns like render props or higher-order components.
If you’re interested in digging in a bit more, I recently published React Hooks in 10 Minutes — which gives a nice primer into hooks. The React team has also provided some excellent documentation.
Create the custom state machine hook
There are a couple of options here, Carlos Galarza has a nice solution with use-machine, but I typically just reach for the useMachine hook provided in the XState documentation.
import { useState, useMemo, useEffect } from ‘react’;
import { interpret } from ‘xstate’;

export function useMachine(machine) {
  // Keep track of the current machine state
  const [current, setCurrent] = useState(machine.initialState);

  // Start the service (only once!)
  const service = useMemo(
    () =>
      interpret(machine)
        .onTransition(state => {
          // Update the current machine state when a transition occurs
          if (state.changed) {
            setCurrent(state);
          }
        })
        .start(),
    []
  );

  // Stop the service when the component unmounts
  useEffect(() => {
    return () => service.stop();
  }, []);

  return [current, service.send];
}
Let’s break down what’s happening above: - At the top of the hook, we’re calling the useState hook to set the default state to the initialState of our state machine. - Then we create a memoized value of our interpreter. The second parameter on useMemo — the empty array — tells React that we don’t have any dependencies, meaning we don’t want React to recompute our memoized value on future renders. - In useEffect, we listen for the component to unmount and, when it does, stop the interpreter service. - And finally, we return the current state of our machine, along with an update function (service.send) that we can use in our components to transition that state.
Defining the state machine
Next, we’ll define the state machine for our payment form. I’ll start by showing the basic machine, then we’ll layer in the various guards and services we’ll need.
const stateMachine = Machine({
  initial: 'idle',
  states: {
    idle: {
      on: {
        SUBMIT: 'loading',
      },
    },
    loading: {
      on: {
        PAYMENT_SUCCESS: 'success',
        PAYMENT_FAILED: 'error',
      },
    },
    error: {
      on: {
        SUBMIT: 'loading',
      },
    },
    success: {
      type: 'final',
    },
  },
});
If we jump over to the XState Visualizer, we can drop the above definition in and see a visualization of the state machine.
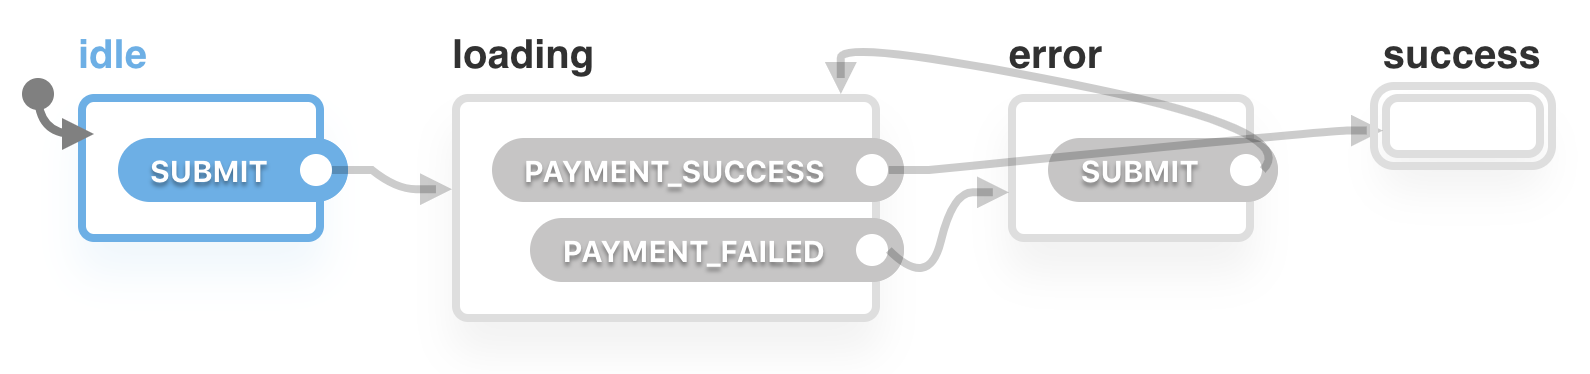
Looks like we nailed this one! We start in the idle state, when the user submits the form, we enter the loading state. From there, we’ll fire off a request and if the payment fails we transition to the error state; and if it succeeds, we transition into the success state. From the error state, the user can submit the form again and be transitioned back into the loading state.
There are a few more things we need to do, though. The first is that we need to check that a user has entered text into the fields before we transition into the loading state… for that, we’ll use guards.
const stateMachine = Machine({
  initial: 'idle',
  context: {
    msg: '',
  },
  states: {
    idle: {
      on: {
        SUBMIT: [
          {
            target: 'loading',
            cond: (ctx, event) =>
              event.data.name !== '' && event.data.card !== '',
          },
          { target: 'error' },
        ],
      },
    },
    // loading state remains the same
    error: {
      on: {
        SUBMIT: {
          target: 'loading',
          cond: (ctx, event) =>
            event.data.name !== '' && event.data.card !== '',
        },
      },
    },
    // success state remains the same
  },
});
In the idle and error states, we have guards that check that the event.data.name and event.data.card values are not empty. In the idle state, we pass an array that tells XState that if the condition fails, that we should transition into the error state.
Lastly, we need to invoke a service in the loading state to call our payment function. I’ve left off all but the relevant parts in this example,
const stateMachine = Machine({
  initial: 'idle',
  context: {
    msg: '',
  },
  states: {
    // idle state remains the same
    loading: {
      invoke: {
        id: 'doPayment',
        src: (ctx, event) => doPayment(event.data),
        onDone: {
          target: 'success',
          actions: assign({ msg: (ctx, event) => event.data }),
        },
        onError: {
          target: 'error',
          actions: assign({ msg: (ctx, event) => event.data }),
        },
      },
    },
    // error and success states remain the same
  },
});
When the user clicks the submit button and we transition into the loading state, we’re now invoking a service that will call our payment function. The payment function will return a promise that is then either resolved or rejected.
If, for example, the promise is rejected (onError), then we’ll transition into the error state. When we transition into the error state we call an action, which in this case uses assign to update the msg context we’ve defined on our machine. This is a helpful place to return error message that we can then display to our user.
For demo purposes, doPayment() is just a function that returns a promise and then “rolls a dice” to determine whether or not to resolve or reject the promise after waiting for 1 second (to fake the feeling of an asynchronous request). If you’re curious, here’s what that looks like:
function fakePayment() {
  return new Promise((resolve, reject) => {
    setTimeout(() => {
      const dice = Math.floor(Math.random() * Math.floor(2));

      if (dice === 0) return resolve('Payment succeeded.');

      return reject('Payment failed.');
    }, 1000);
  });
}
Putting it all together
Lastly, we need to build our actual component. Let’s start with the basic HTML and CSS from the CodePen embed at the beginning of this post, then we’ll start wiring things up.
Here’s the starting point for our component:
const App = () => {
  return (
    <div className="form-container">
      <div className="form-header">
        <h2>State Machine Payment Form</h2>
      </div>

      <div className="form-body">
        <form>
          <div className="form-group">
            <label htmlFor="NameOnCard">Name on card</label>
            <input
              id="NameOnCard"
              className="form-control"
              type="text"
              maxLength="255"
            />
          </div>
          <div className="form-group">
            <label htmlFor="CreditCardNumber">Card number</label>
            <input
              id="CreditCardNumber"
              className="null card-image form-control"
              type="text"
            />
          </div>
          <button
            id="PayButton"
            className="btn btn-block btn-success submit-button"
            type="submit"
          >
            <span className="submit-button-lock" />
            <span className="align-middle">Pay Now</span>
          </button>
        </form>
      </div>
    </div>
  );
};
The first thing we should do to start wiring everything up is set our default state:
const App = () => {
  const [machine, send] = useMachine(stateMachine);
  const [form, setForm] = useState({
    name: '',
    card: '',
  });
  // markup remains unchanged
};
Here, we first pass the state machine that we defined in the last section to the custom hook that we defined in the section before. Then we define a separate, component-specific useState that we will store our form variables in. Since they’re not values that need to be communicated to other machines or components, I like to keep them local to the component where they are needed.
Next, we can add our error and success messages:
const App = () => {
  // consts remain unchanged
  return (
    <div>
      <div className="form-container">
        <div className="form-header">
          <h2>State Machine Payment Form</h2>
        </div>

        {machine.matches('error') ? (
          <div className="alert error">
            {machine.context.msg
              ? machine.context.msg
              : 'You must fill out all the form fields.'}
          </div>
        ) : null}

        {machine.matches('success') ? (
          <div className="alert success">
            {machine.context.msg ? machine.context.msg : null}
          </div>
        ) : null}

        // rest of the markup remains unchanged
    </div>
  );
};
Here we’re checking if the current state of our machine matches either error or success. If so, we display our alert with the message that was assign’d to our machine context message.
The final step will be to wire our form submission up to the machine itself.
<form
  onSubmit={(e) => {
    e.preventDefault();
    send({ type: 'SUBMIT', data: { ...form } });
  }}
>
  <div className="form-group">
    <label htmlFor="NameOnCard">Name on card</label>
    <input
      id="NameOnCard"
      className="form-control"
      type="text"
      maxLength="255"
      value={form.name}
      onChange={(e) => updateForm({ ...form, name: e.target.value })}
    />
  </div>
  <div className="form-group">
    <label htmlFor="CreditCardNumber">Card number</label>
    <input
      id="CreditCardNumber"
      className="null card-image form-control"
      type="text"
      value={form.card}
      onChange={(e) => updateForm({ ...form, card: e.target.value })}
    />
  </div>
  <button
    id="PayButton"
    className="btn btn-block btn-success submit-button"
    type="submit"
  >
    <span className="submit-button-lock" />
    <span className="align-middle">Pay Now</span>
  </button>
</form>
When the user submits the form, we will call preventDefault() so that the browser doesn’t refresh the page. Then we send the SUBMIT event to the machine, along with the data that the user has provided in the form fields. That data is what the machine will use when it checks the guard conditions, then subsequently transitions into the loading state, and finally sends that data along with our doPayment() function.
And now, here’s the final payment form:
Hey, as I mentioned earlier in this post, I actually made a course about building JavaScript applications with state machines and statecharts. Version 2 is on its way! If you want to check out the course, you can find it at learnstatemachines.com.